This short manual will explain how one is able to repair a broken Sennheiser MD421.
Not long ago I was given a broken MD421-2 Sennheiser microphone dating from the mid sixties. It was thin sounding with no bass, or put differently: loss of low end.
Searching the internet, it becomes clear that it is actually a very common problem, but no real solutions are given otherwise that the mic is at the end of its life.
To me this is always unacceptable!
However it is mentioned that an iron dust ring, or a torn or otherwise damaged membrane might be the cause. The microphone was outside still in good shape and not physically abused, so my guess was that it had to do with iron dust……
Before you start: CLEAN YOUR DESK. Any additional iron dust will make it worse! Yes, your desk is littered with it even if you do not see it! Use a magnet to clean it off your desk.
Then, the microphone needs to be taken apart in its separate components:
- The tuchel connector (desolder!)
- The plastic housing
- The microphone capsule
- The stainless steel protective grid.
The screw to open the mic is located underneath the serial number plate. Once removed you can take the connector out. Mine was difficult to open because the connector fits very well. Force is needed, but not so much to break the plastic. I used a big screwdriver as leverage. If the connector is out of the way, you will see a nut on the inside of the mic holding the capsule mounting rod. Remove this nut and the capsule with the stainless steel grid will come off the front of the mic. To get to the capsule, remove the 4 screws found on the 4 corners of base.
It is the membrane, sometimes called diaphragm, of the capsule I wanted to verify. Looking though my reading glasses AND a strong magnifying glass using a bright light source (adjustable IKEA LED) I was able to see some hints of iron dust underneath the (nylon?) dust protection. Bugger….. how to get under the nylon…..
Note that you have to hold the capsule in your (steady) hand very close to the eye using a strong light reflected from the membrane otherwise you will not be able to see it. It will take some practising! Do not give up!
As the mic was broken anyway and I had nothing to lose, I gently pealed (ripped..)the dust protection from the capsule with a pair of tweasers. It will require considerable force, thus it is a nerve wracking bussiness. One false move will distroy the mic forever. Do not tear the dust protection too much as it needs to be glued back later when ready! Also, do NOT remove the hum compensating induction coil on top of the capsule.
In the picture above you can see that the the dust protection is molten to the black plastic ring aroung the mic (the black dots in the pic.). As I was now able to bend the dust protection out of the way (with one finger), I could now better see a very fine ring of iron dust just above the voice coil.
It was really not much, but apparently, next to nothing is enough to make the mic sound bad. Amazing how this stuff can penetrate the fine metal mesh AND the even more fine nylon mesh! The iron dust weight is very little, but because of the pull of the magnet in the capsule, it pulls the membrane to the magnet. Thus it will not be able to move freely and will loose bass. Hence loss of low end!
HOW TO GET IT OF??
The solution is to magnetise a VERY small steel screwdriver (used to fix watches) with a permanent magnet. Magnetising is achieved by whiping a permanent magnet (from a loudspeaker or so) over the screwdriver.
By very carefully putting/placing the screwdriver in between the nylon cover and the membrane (diaphragm) over the dust ring, the magnetised tip will pick or pull the dust ring away. It will stick to the sharp side of the srewdriver as the field is strongest there. Then slowly remove the screwdriver, clean it and do it again.
It requires a long time removing dust particle after dust particle. It took me more than one hour (!) to clean the membrane completely. Take your time, rest once a while as you WILL develop a headache if you don’t (like I did…). Believe me it is worth it!
As there is not much space under the nylon and above the membrane and the magnet of the mic wants to pull the screwdriver onto the membrane, be very carefull NOT to touch it. Denting it means end of story! The magnet is stronger than you think, so firmly grip your screwdriver and do not let it slip out of your fingers.
So I repeat: Loosen the dust protection, bend it out of the way and clean the iron dust carefully away with the tip of a magnetised small screw driver. Don’t forget your reading glasses, and perhaps one of these cheap reading glasses on top of that. I have held the capsule up to 5 cm from my eye, otherwise I was not able to see the particles. They are VERY SMALL and little is enough to get a bad sounding mic!
You will not be able to test the capsule outside its casing if it sounds any better as the casing is essential to the sound produced by the mic. Interestingly, the casing acts as a sound chamber, even with its own bass reflex. (These are the 4 little holes next to the connector!)
After re-glueing the dust protector with 5 min epoxy (very little!) I reassembled the mic. The final result is perfect as it is sounds like NEW. I know, because I have some exceptionally well preserved MD421-N as well for comparisson. So now the “once broken” mic is fully repaired!
You can imagine that I was (am) very glad!
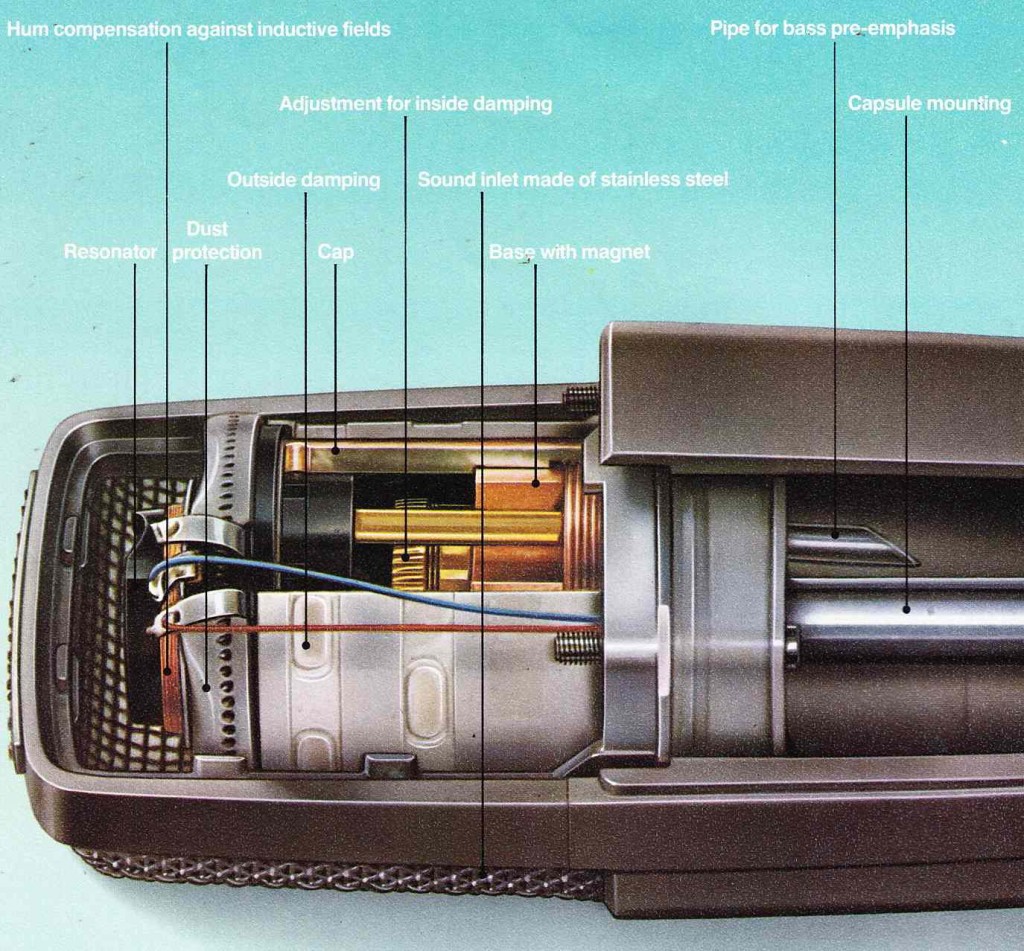
See below for a schematic overview of the mic components. Clicking it will make it larger. You will identify 3 different sound chambers. Make sure the capsule of the mic with the stainless steel grid is firmly attached to the mic’s body. If not the mic will leak and will still sound thin.
I hope this “lecture” on how to repair a broken thin sounding Sennheiser MD421 will help to repair a few others around the world. But I have to say: following my instructions is at your own risk!